Guardian Angel Slime
 | |
| Prequest | [Ramuramu] Who's REALLY the Cutest of Them All?[1] |
| Entry Level | 210+ |
| Party Size | 1 - 6 |
| Potion Cooldown | 5 seconds |
| Time Limit | 30 minutes |
| Death Count | 5 |
| Clear Limit | 1 clear every week (shared with Chaos) |
| Required Combat Power (CMS) | Total or 1-Person: 2,000,000 2-Person: |
| Entry Level | 210+ |
| Party Size | 1 - 6 |
| Potion Cooldown | 5 seconds |
| Time Limit | 30 minutes |
| Death Count | 5 |
| Clear Limit | 1 clear every week (shared with Normal) |
| Required Combat Power (CMS) | Total or 1-Person: 20,000,000 2-Person: |
| Name (Other Servers) | |
| KoreaMS | 가디언 엔젤 슬라임 (Guardian Angel Slime) |
| JapanMS | ガーディアンエンジェルスライム (Guardian Angel Slime) |
| ChinaMS | 守护天使绿水灵 (Guardian Angel Green Slime) |
| TaiwanMS | 守護天使綠水靈 (Guardian Angel Green Slime) |
| MapleSEA | Divine King Slime |
Based on the reports from its initial discovery, and stories told by other slimes, the Guardian Angel Slime appears to be the very slime that its god once deemed most adorable.
As a side note, this chronicler suspects that the Slime God's standards for cuteness are based on size, color, and natural appearance. When compared to other slimes, the type that experience sudden growth through a Growth Potion, this one is clearly cuter.”
- ― Chronicler Ritt
.png)
Guardian Angel Slime is a boss found in Ramuramu Valley, an area near Partem.
Battle Overview
Guardian Angel Slime can be fought in Normal and Chaos mode. You must be in a party of 1 to 6 members to fight it, and each player will have a Death Count of 5. If all players reach a Death Count of 0, the battle will end and all players will be kicked out of the map. The battle has a time limit of 30 minutes, and a Potion Cooldown of 5 seconds is applied. All attacks deal % HP damage, so they must be manually avoided as they ignore any evasion stats and damage reduction skills (unless the skill is specifically stated to include damage proportional to HP).
The battle consists of a single phase, with two different health bar colors being indicated: the true health in light green, and recoverable health in dark green. Players will successfully defeat the Guardian Angel Slime when its true health is depleted. The Guardian Angel Slime will enter a guardian wave pattern every 90 seconds (reduced from 150 seconds in the Assemble Update), where successfully completing the pattern will put the boss in a groggy state for 10 seconds. Players will deal 85% of their final damage against the Guardian Angel Slime throughout the fight, except while it is in a groggy state, when players will deal 110% of their final damage. All attacks deal % HP damage, so they must be manually avoided as they ignore any evasion stats and damage reduction skills (unless the skill is specifically stated to include damage proportional to HP).
The following patterns are present in this battle. NOTE: Most status effects and damage values will vary based on difficulty, and will be listed in order from lowest difficulty to highest. Example: if listed as 25% / 30%, then the 25% correlates to Normal mode and the 30% correlates to Chaos mode. If there are no listed values, then it is the same regardless of difficulty unless stated otherwise.
-
 Magma Slime
 -
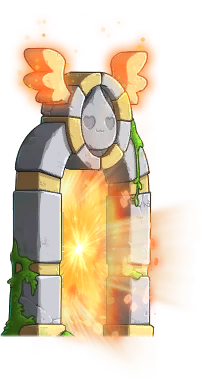 Holy Gate (Orange)
 -
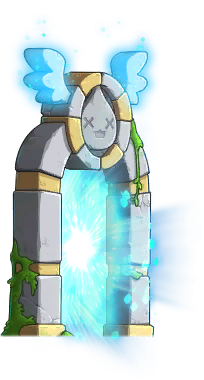 Holy Gate (Blue)
 -
 Holy Gate (Green)
 -
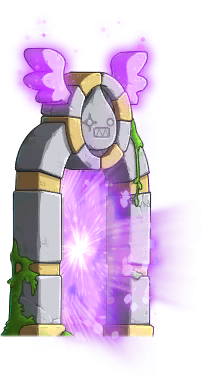 Holy Gate (Purple)

.png)
.png)
.png)
.png)
- Healing: The Guardian Angel Slime recovers 1% of its max HP every 60 / 30 seconds, up to the maximum allowed by their recoverable health indicated by the dark green health bar color.
- Magma Slime: Every 15 seconds, 4 Magma Slimes will fall down at random locations in the map. If a Magma Slime lands on a player, they will be briefly stunned, and the slime will disappear. Standing near a Magma Slime will cause players to receive 5% HP damage per second. A maximum of 12 Magma Slimes can be on the map at any given time.
- Holy Gates: There are 4 holy gates in the corners of the map, each with a different color: orange at the top left, blue at the top right, green at the bottom left, and purple at the bottom right. When Magma Slimes spawn, up to a maximum of 3 gates will target a random party member, then fire a Guardian Ray in the direction of that player after a 4 second delay. The Guardian Ray hits up to 6 times, dealing 10 / 20% HP damage each time, and inflicting Stun for 5 seconds. The Stun duration cannot be reduced by Status Resistance.
- Slime Gauge: each player has a gauge that fills up fully over 8 / 10 seconds. When full, players can activate the gauge with the NPC Chat / Harvest key, followed by either the Up or Down Arrow to summon an Archetypal Slime that fires a projectile towards the location directly in front of the player. The projectile uses inverted controls, so it will fire upwards if the player presses the Down Arrow, and downwards if the player presses the Up Arrow. If the projectile hits a Magma Slime, it will be launched in the direction of the projectile. Magma Slimes will obstruct Holy Gates in its flight path, and 2 Magma Slimes are needed to fully block a Holy Gate. When fully blocked, a Holy Gate will be unable to fire its Guardian Ray.
- Slime Burst: Green bubbles will appear randomly throughout the fight, inflating and bursting after a short period of time. Players standing where the bursts occur will take 10 / 20% HP damage and be inflicted with Slow for up to 4 seconds.
- Slam: The Guardian Angel Slime jumps into the air, then slams down after 1 second, dealing 100% HP damage to all players standing on the ground on the same platform. This can be avoided by jumping.
- Bubble Whip: The Guardian Angel Slime uses its bubble as a whip, dealing 30 / 50% HP damage to nearby players on the same platform, inflicting Stun for 1 / 2 seconds, and applying Super Knockback. The stun duration cannot be reduced by status resistance.
- Laser: The Guardian Angel Slime fires a red laser from its crown, dealing 40 / 70% damage to players in front of it and players standing on the platform above it.
- Slime Trail: The Guardian Angel Slime periodically leaves a trail of slime that lingers for 15 seconds, dealing 1 / 2% HP damage every 0.5 seconds for 4 seconds and inflicting Slow.
- Summon Slimes: The Guardian Angel Slime continuously summons Slimes. There are 5 different varieties of Slimes, each with different effects:
- Troublemaker Slime: Deals 5% HP touch damage. Looks identical to a regular green Slime.
- Gold Slime: Deals 10% HP touch damage. Instantly fills the Slime Gauge when defeated.
- Explosive Slime: Self-destructs after a player comes near it, dealing 20 / 25% HP damage.
- Romantic Slime: Deals 5% HP touch damage. Launches hearts towards random players, dealing 15 / 20% HP on impact with a 70% chance to inflict Seduce for up to 4 seconds, forcing the player to jump to the left.
- Halo Slime: Deals 5% HP touch damage. Summons a sword that deals 20 / 25% HP damage to nearby players. If 5 Halo Slimes are present on the map, the Guardian Wave pattern will immediately start.
- Guardian Wave Pattern: Every 90 seconds (reduced from 150 seconds in the Assemble Update), the Guardian Angel Slime will disappear, the bottom half of the map will open up, and the Guardian Wave Pattern will begin.
During the Guardian Wave Pattern, the following mechanics are in effect:
- Map expansion: The bottom half of the map will open up, revealing 4 Holy Gates with the same colors as the upper half, but in a random order. When the Guardian Wave Pattern ends, the bottom half of the map will close after 10 seconds, and players who are in the closed section will be instantly killed.
- Crystal Drop: each player's Slime Gauge will be replaced with the Crystal Drop meter. Activating Crystal Drop with the NPC Chat / Harvest key will place a crystal at the location of the player, or destroy one if the player is standing on top of a crystal. A maximum of 20 crystals can be placed by the party during each wave, and a platform is only allowed to have 1 crystal.
- Guardian Wave: A wave of Slimes appears near the right edge of the top platform and travels to the right. When the slime wave reaches the edge of a platform, it will fall straight down and continue moving straight along the platform it falls on, in the direction of whichever edge is farther away. If a slime wave comes in contact with a crystal, it will immediately change directions. Crystals are shattered after coming in contact with a slime wave twice. There are 3 different colors of guardian waves:
- Green: This wave should be guided into a Holy Gate of the same color as one that was fully blocked in the upper half.
- Pink: This wave spawns if at least 20 Slimes are present in the map at the time the Guardian Wave Pattern begins. They travel much faster and should be guided into a Holy Gate of the same color as one that was fully blocked in the upper half.
- Gold: This wave will appear if the Guardian Angel Slime's HP is below 67% and a message stating You could only block two gates this time... appears on the party's screen. They should be guided into a Holy Gate of the same color as one that was not blocked in the upper half. During the time leading up to this Guardian Wave, players are prevented from blocking more than 2 Holy Gates with their Slime Gauges.
Should a Slime Wave enter a Holy Gate with a color different from the one they are expected to be guided into, a second Slime Wave will spawn to give players a second chance, with players receiving a total of three chances. The Guardian Wave Pattern will end after 10 seconds, and the Guardian Angel Slime will either return to normal or enter the groggy state depending on whether players failed or successfully completed the wave pattern challenge. If the Guardian Angel Slime is in its groggy state, it will receive 10% more final damage from all players and be resistant to all bind effects for 15 seconds. Any damage the Guardian Angel Slime receives during the groggy state will also permanently reduce its recoverable health, indicated by the dark green color in its health bar.
Monster
Ramuramu Valley
Normal
Normal: Boss
|
| ||||||||||||||||||||||
| Level | 220 | HP | 5,000,000,000,000[2] | MP | 10,000,000 | EXP | 0 | |||||||||||||||
|---|---|---|---|---|---|---|---|---|---|---|---|---|---|---|---|---|---|---|---|---|---|---|
| Attack | 22,000 | Defense Rate | PDR: 300% MDR: 300% |
Speed | -20 | Additional Points | None | |||||||||||||||
| Elements | ||||||||||||||||||||||
| Resistant | Resistant | |||||||||||||||||||||
| Resistant | Resistant | |||||||||||||||||||||
| Resistant | Resistant | |||||||||||||||||||||
| Resistant | No | |||||||||||||||||||||
| Other | ||||||||||||||||||||||
| Category | Enchanted | |||||||||||||||||||||
| Summons | ||||||||||||||||||||||
| Equipment Drops | None | |||||||||||||||||||||
| Usable Drops | None | |||||||||||||||||||||
| Set-up Drops | None | |||||||||||||||||||||
| Etc. Drops | None | |||||||||||||||||||||
| Quest Drops | None | |||||||||||||||||||||
| Locations | Ramuramu Temple | |||||||||||||||||||||
Normal: Reward
| Slime Treasure Chest (Boss) | ||||||||||||||||||||||

| ||||||||||||||||||||||
| Level | 220 | HP | 100,000 | MP | 10,000,000 | EXP | 0 | |||||||||||||||
|---|---|---|---|---|---|---|---|---|---|---|---|---|---|---|---|---|---|---|---|---|---|---|
| Attack | 22,000 | Defense Rate | PDR: 300% MDR: 300% |
Speed | Stationary | Additional Points | Ambition EXP: 388 Weapon Points: 300 Guild Points: 1,500 Party GP Bonus: 3,000 | |||||||||||||||
| Elements | ||||||||||||||||||||||
| Neutral | Neutral | |||||||||||||||||||||
| Neutral | Neutral | |||||||||||||||||||||
| Neutral | Neutral | |||||||||||||||||||||
| Neutral | No | |||||||||||||||||||||
| Other | ||||||||||||||||||||||
| Category | Enchanted | |||||||||||||||||||||
| Fixed Damage | 1,000 | |||||||||||||||||||||
| Equipment Drops | Guardian Angel Ring | |||||||||||||||||||||
| Usable Drops |
| |||||||||||||||||||||
| Set-up Drops | None | |||||||||||||||||||||
| Etc. Drops |
| |||||||||||||||||||||
| Quest Drops | None | |||||||||||||||||||||
| Locations | Silent Altar | |||||||||||||||||||||
Chaos
Chaos: Boss
|
| ||||||||||||||||||||||
| Level | 250 | HP | 90,000,000,000,000[2] | MP | 10,000,000 | EXP | 0 | |||||||||||||||
|---|---|---|---|---|---|---|---|---|---|---|---|---|---|---|---|---|---|---|---|---|---|---|
| Attack | 22,000 | Defense Rate | PDR: 300% MDR: 300% |
Speed | -20 | Additional Points | None | |||||||||||||||
| Elements | ||||||||||||||||||||||
| Resistant | Resistant | |||||||||||||||||||||
| Resistant | Resistant | |||||||||||||||||||||
| Resistant | Resistant | |||||||||||||||||||||
| Resistant | No | |||||||||||||||||||||
| Other | ||||||||||||||||||||||
| Category | Enchanted | |||||||||||||||||||||
| Summons | ||||||||||||||||||||||
| Equipment Drops | None | |||||||||||||||||||||
| Usable Drops | None | |||||||||||||||||||||
| Set-up Drops | None | |||||||||||||||||||||
| Etc. Drops | None | |||||||||||||||||||||
| Quest Drops | None | |||||||||||||||||||||
| Locations | Ramuramu Temple | |||||||||||||||||||||
Chaos: Reward
| Slime Treasure Chest (Boss) | ||||||||||||||||||||||
|
| ||||||||||||||||||||||
| Level | 250 | HP | 100,000 | MP | 10,000,000 | EXP | 0 | |||||||||||||||
|---|---|---|---|---|---|---|---|---|---|---|---|---|---|---|---|---|---|---|---|---|---|---|
| Attack | 22,000 | Defense Rate | PDR: 300% MDR: 300% |
Speed | Stationary | Additional Points | Ambition EXP: 388 Weapon Points: 300 Guild Points: 3,000 Party GP Bonus: 6,000 | |||||||||||||||
| Elements | ||||||||||||||||||||||
| Neutral | Neutral | |||||||||||||||||||||
| Neutral | Neutral | |||||||||||||||||||||
| Neutral | Neutral | |||||||||||||||||||||
| Neutral | No | |||||||||||||||||||||
| Other | ||||||||||||||||||||||
| Category | Enchanted | |||||||||||||||||||||
| Fixed Damage | 1,000 | |||||||||||||||||||||
| Equipment Drops | Guardian Angel Ring | |||||||||||||||||||||
| Usable Drops |
| |||||||||||||||||||||
| Set-up Drops | None | |||||||||||||||||||||
| Etc. Drops |
| |||||||||||||||||||||
| Quest Drops | None | |||||||||||||||||||||
| Locations | Silent Altar | |||||||||||||||||||||
Gallery
-
 Guardian Angel Slime Maple Guide icon
 -
 Guardian Angel Slime Boss UI artwork (current)
 -
 Guardian Angel Slime Boss UI artwork (old)
 -
 Guardian Angel Slime Boss Entry UI artwork
 -
Boss Entry Cutscene


_-_Guardian_Angel_Slime.png)

Videos
Trivia
- This is the first major boss since Damien to be released in KMS without a special power requirement such as Arcane Power or Sacred Power.
References
| Monsters | |||||||
|---|---|---|---|---|---|---|---|
| Monsters | |||||||
| 1 - 10 | 11 - 20 | 21 - 30 | 31 - 40 | 41 - 50 | 51 - 60 | ||
| 61 - 70 | 71 - 80 | 81 - 90 | 91 - 100 | 101 - 110 | 111 - 120 | ||
| 121 - 130 | 131 - 140 | 141 - 150 | 151 - 160 | 161 - 170 | 171 - 180 | ||
| 181 - 190 | 191 - 200 | 201 - 210 | 211 - 220 | 221 - 230 | 231 - 240 | ||
| 241 - 250 | 251 - 260 | 261 - 270 | 271 - 280 | 281 - 290 | 291 - 300 | ||
| Major Bosses | |||||||
| Area Bosses | |||||||
| Root Abyss | |||||||
| Elite Bosses | |||||||
| Black Mage and his commanders | |||||||
| Grandis | |||||||
| Special Content | |||||||
| Overseas Exclusive | |||||||
| Quest Monsters | |||||||
| 1 - 10 | 11 - 20 | 21 - 30 | 31 - 40 | 41 - 50 | 51 - 60 | ||
| 61 - 70 | 71 - 80 | 81 - 90 | 91 - 100 | 101 - 110 | 111 - 120 | ||
| 121 - 130 | 131 - 140 | 141 - 150 | 151 - 160 | 161 - 170 | 171 - 180 | ||
| 181 - 190 | 191 - 200 | 201 - 210 | 211 - 220 | 221 - 230 | 231 - 240 | ||
| 241 - 250 | 251 - 260 | 261 - 270 | 271 - 280 | 281 - 290 | 291 - 300 | ||
| Other Monsters | |||||||
|
Mu Lung Dojo • Monster Park • Party Quest • Mirror World • Maple Tour • Tower of Oz • Special • Theme Dungeons • Epic | |||||||